Usually Python is not pre-installed by default on Windows like Mac OS. So if you are a Windows user, you have to install it manually.
In this article I will show how to install Python on Windows. If you are a Mac user and want to install the latest version of Python then check my another article Install Python on Mac Operating System.
Check Python version
Though Python is not pre-installed by default, it’s always better to check before going to a fresh installation. Open your Power Shell (terminal) and run the following command to check whether Python already installed or not.
$ python --version
Python 3.7.2
You can see, it shows Python 3.7.2, that’s because I have Python installed on my computer. Most likely you won’t see this if Python is not installed on your computer. So, let’s install it.
Install Python on Windows
To install Python,
- go to the download section of the Python website
- download the latest version of Python for Windows (currently latest version is 3.7.3 as on April 2019).
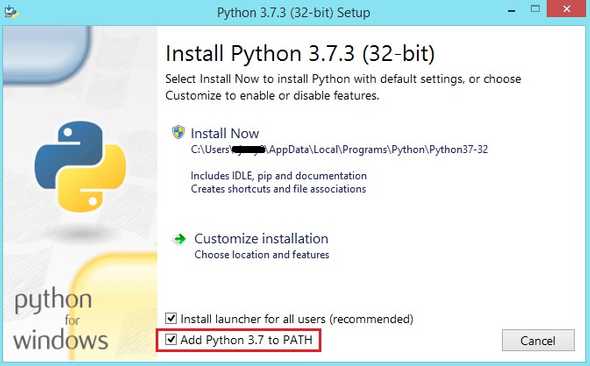
- to start the installer, right-click on the installer (i.e. python-3.7.3.exe) and select Run as Administrator. You should see a python installation window as shown in the below image.
- make sure to tick the check box of Add Python 3.7 to PATH option. This will automatically set the path to system environment variables and let you use python directly from terminal. Otherwise you have to set this path manually in your system environment variables.
- lastly, click Install Now to start install if you are happy with the default settings; otherwise click Customize installation and set your preference, then start to install.
After a while your installation will be finished. That’s it! Now you have working Python on your Windows machine.

Let’s check the version by running the following command again and this time you should see latest version of Python is installed on your computer.
$ python3 --version
Python 3.7.3
All set! You can now open the Python shell by running the $ python command and start python coding, like below.
$ python3
Python 3.7.2 (...) [...] on win32
Type "help", "copyright", "credits" or "license" for more information.
>>>
To exit from the python shell type exit() and press Enter key. Alternatively, you can press Ctrl + C together to exit form the shell.
Note
If you have multiple versions of python installed on your computer, then you have to decide which version of python will run from the command line. Because, even you manually or automatically set up the PATH for your currently installed python, most likely the previously installed python version will be executed because it is higher in the list of variables gets used.
Let say you have Python2 already installed on your computer and now you have installed Python3. So, if you open Python Shell by typing $ python command in your terminal, most likely you will get Python2 is running.
However, after doing a small trick you can also have Python3 is working while you type $ python3 command in your terminal. To do that, go to the folder where Python3 is installed. Then make a duplicate copy of python.exe file in the same directory and rename it to python3.exe . But remember, do not delete or rename the original python.exe file. You should keep the both files in same directory.
Now, type $ python3 command in your terminal, you should have Python3 running and type $ python if you want to run python2. That’s way you can keep both version of Python working and run which one you want.
Summary
Python installation on Windows is very straight forward. You just have to go with the installation process. However, for beginners, it is always a headache. By following this article you can install Python on your computer.
Happy Python coding!
Comments
You are welcome to write comments, suggestions, corrections, or any queries related to the article. Your comments may take some time to be appeared. Please be aware that any irrelevant comments will be deleted. Thanks for your understanding, and your respectful & relevant comments!